Recipes: Chile con Queso (Chihuahua Style)

Cheese, Cooking, Food, Life, Mexican Mondays, Mexico, Recipes, Uncategorized

Sweets and Life: Chile con Queso (Chihuahua Style)

One of my mom’s favorite things to eat is chile con queso.  This dish shouldn’t be confused with the every popular chile con queso dip that you find at many Tex-Mex restaurants. It is not drowned in a sea of  Velveeta by any means but it is delicious in its own right.  Growing up I would spend my summers in Chihuahua, Mexico where I ate more than my share of chile con queso.  On any given day I could go to any of my aunt’s houses and often than none they would all be making this dish.  Seriously, my people love this dish!

Now that my parents live with us (more on that later) I often find myself eating this for breakfast, lunch, or dinner. This dish is so versatile because it can be served with different things.  You can have it with eggs for breakfast, you can have it as a burrito for lunch, or you can add steak in it for dinner. I hope you are able to try and enjoy this dish as much as we do.

Chile con Queso (Chihuahua Style)

The main ingredient you need for this dish are Anaheim chiles. Once you wash them put the chiles directly on a cast iron skillet and roast them over medium high heat.  Be careful not to burn them too much otherwise you will find yourself coughing up a lung and rushing towards the fire alarms like we often do.

Sweets and Life: Chile con Queso (Chihuahua Style)

Once they are completely roasted and the peel begins to loosen take them off the heat.  Caution they will be extremely hot! Please try not to handle them with your bare hands.

Sweets and Life: Chile con Queso (Chihuahua Style)

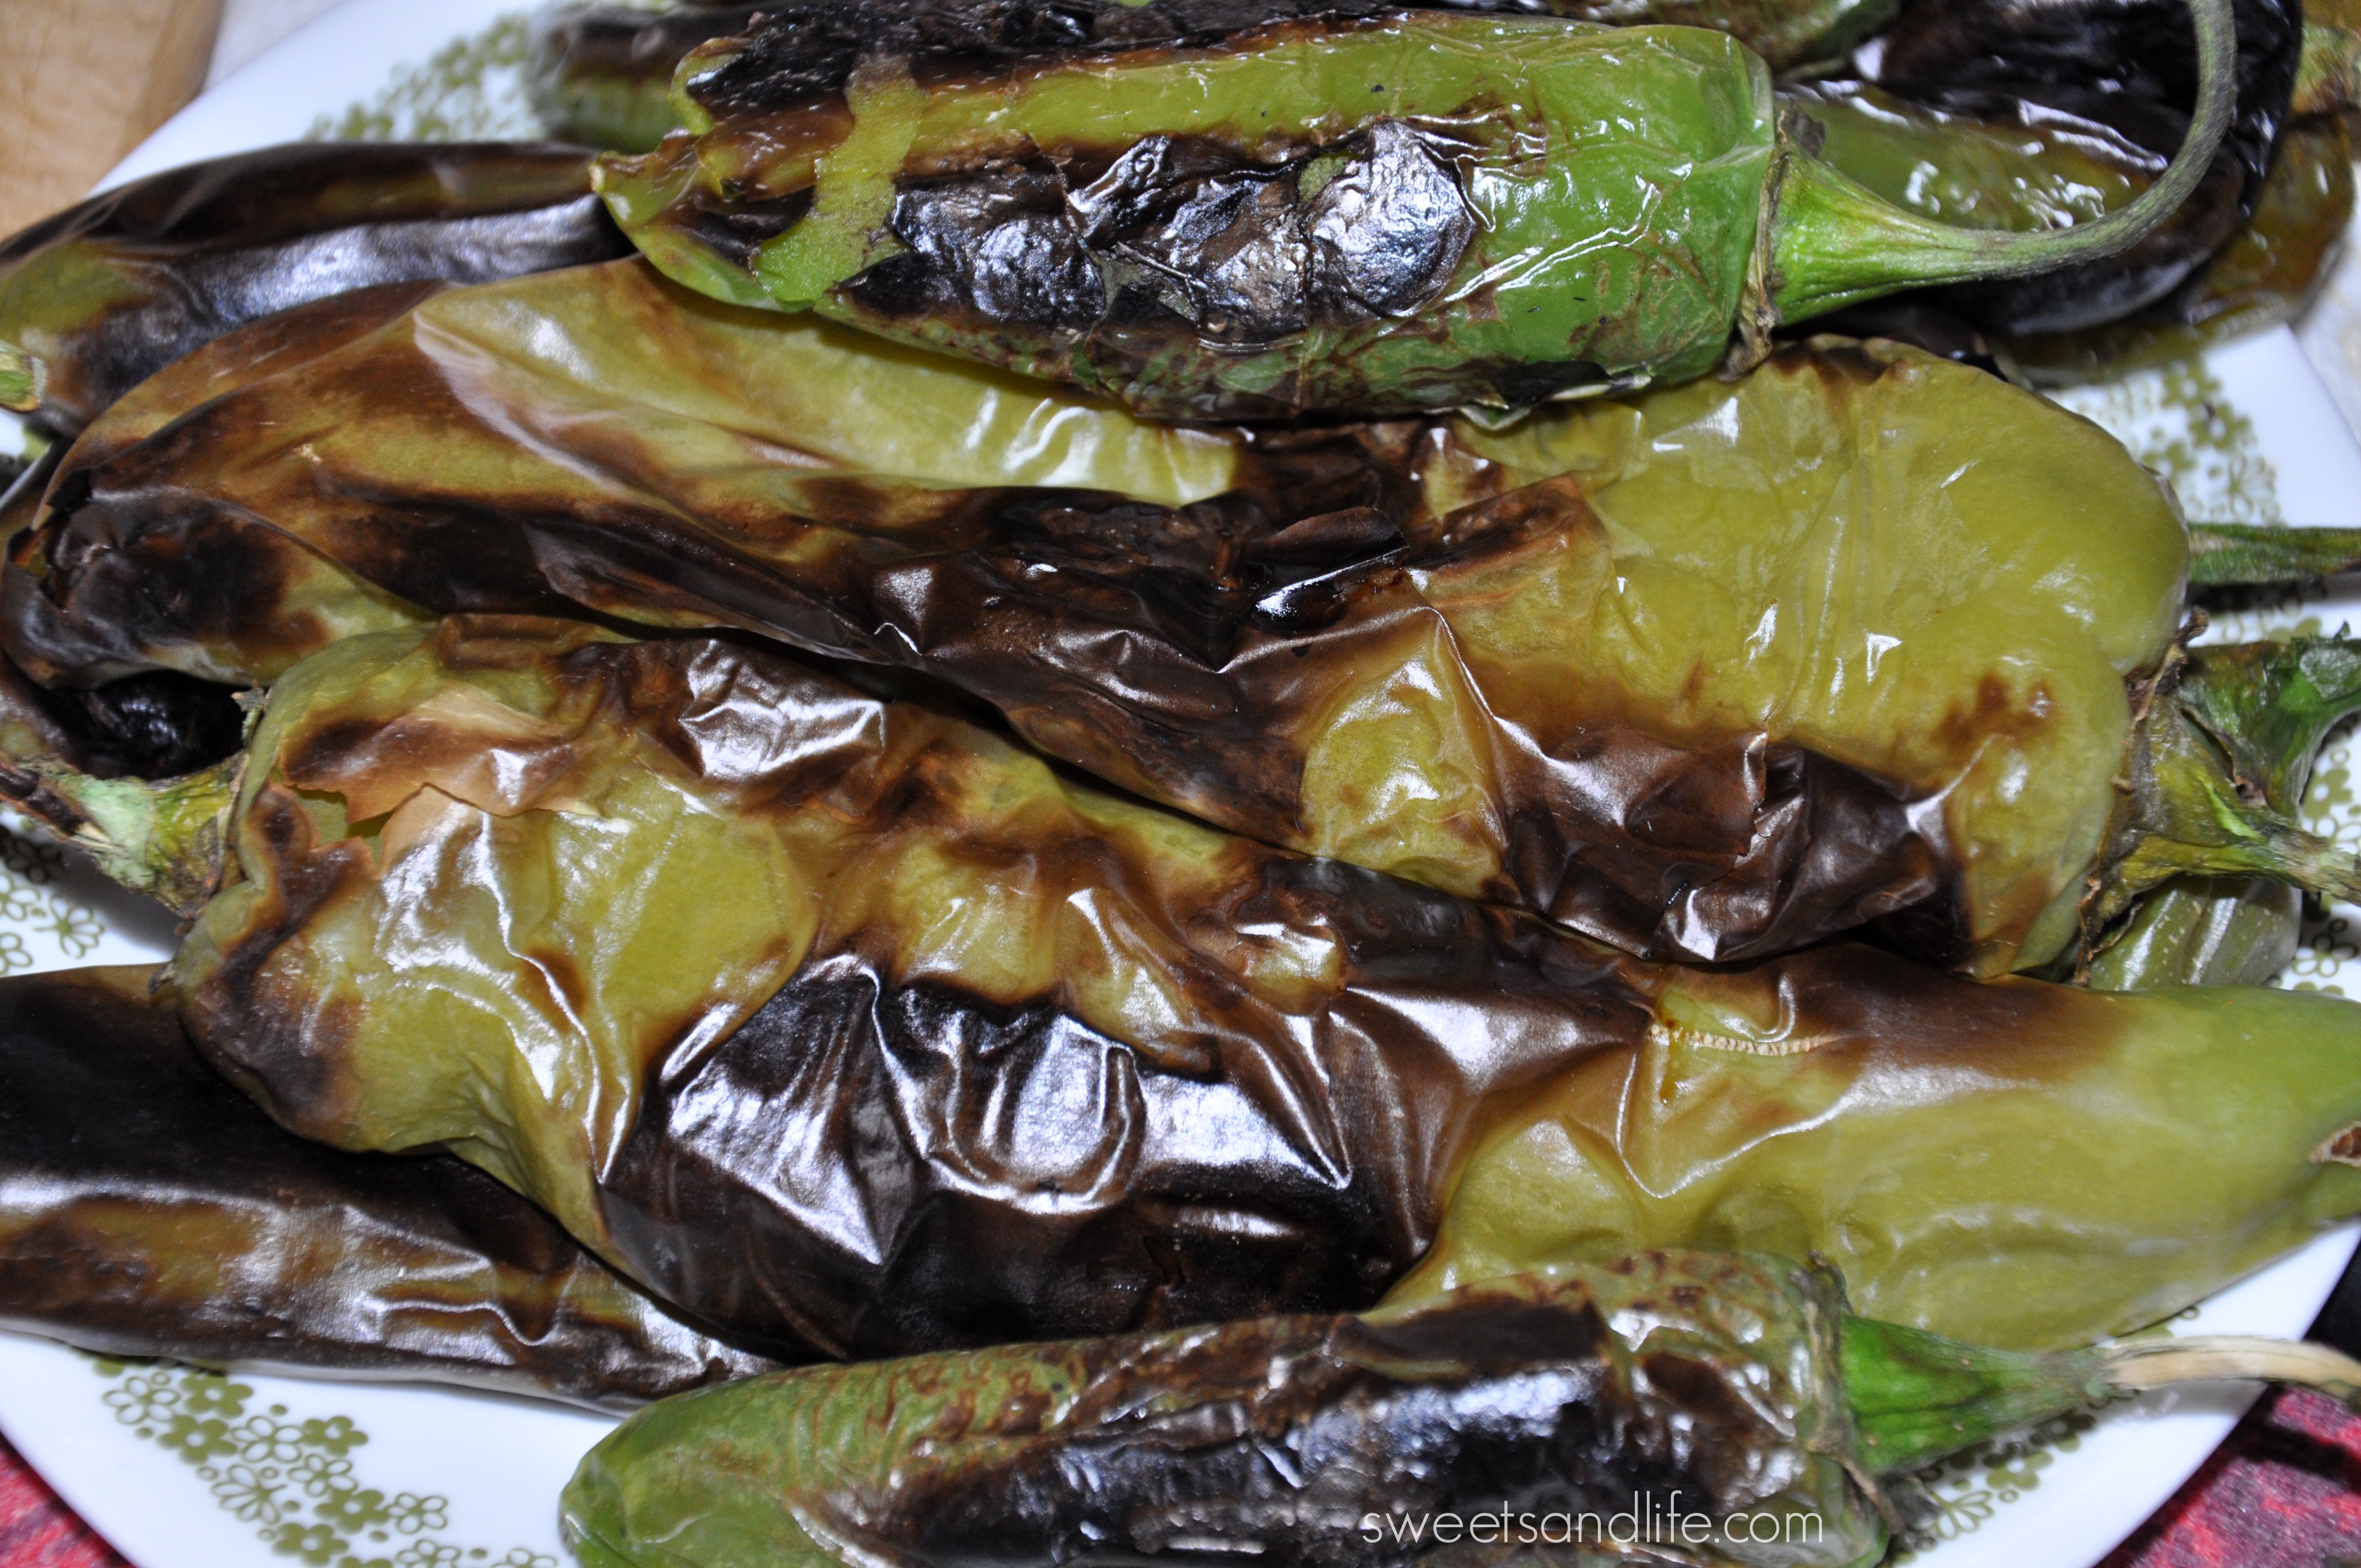
Let them cool for a few minutes before peeling them because like I said before they will be extremely hot.  By the way don’t scratch your eyes or any other part of your face because they might be a tad spicy. With your hands careful take off the peel and throw that part away along with the stems.

Sweets and Life: Chile con Queso (Chihuahua Style)

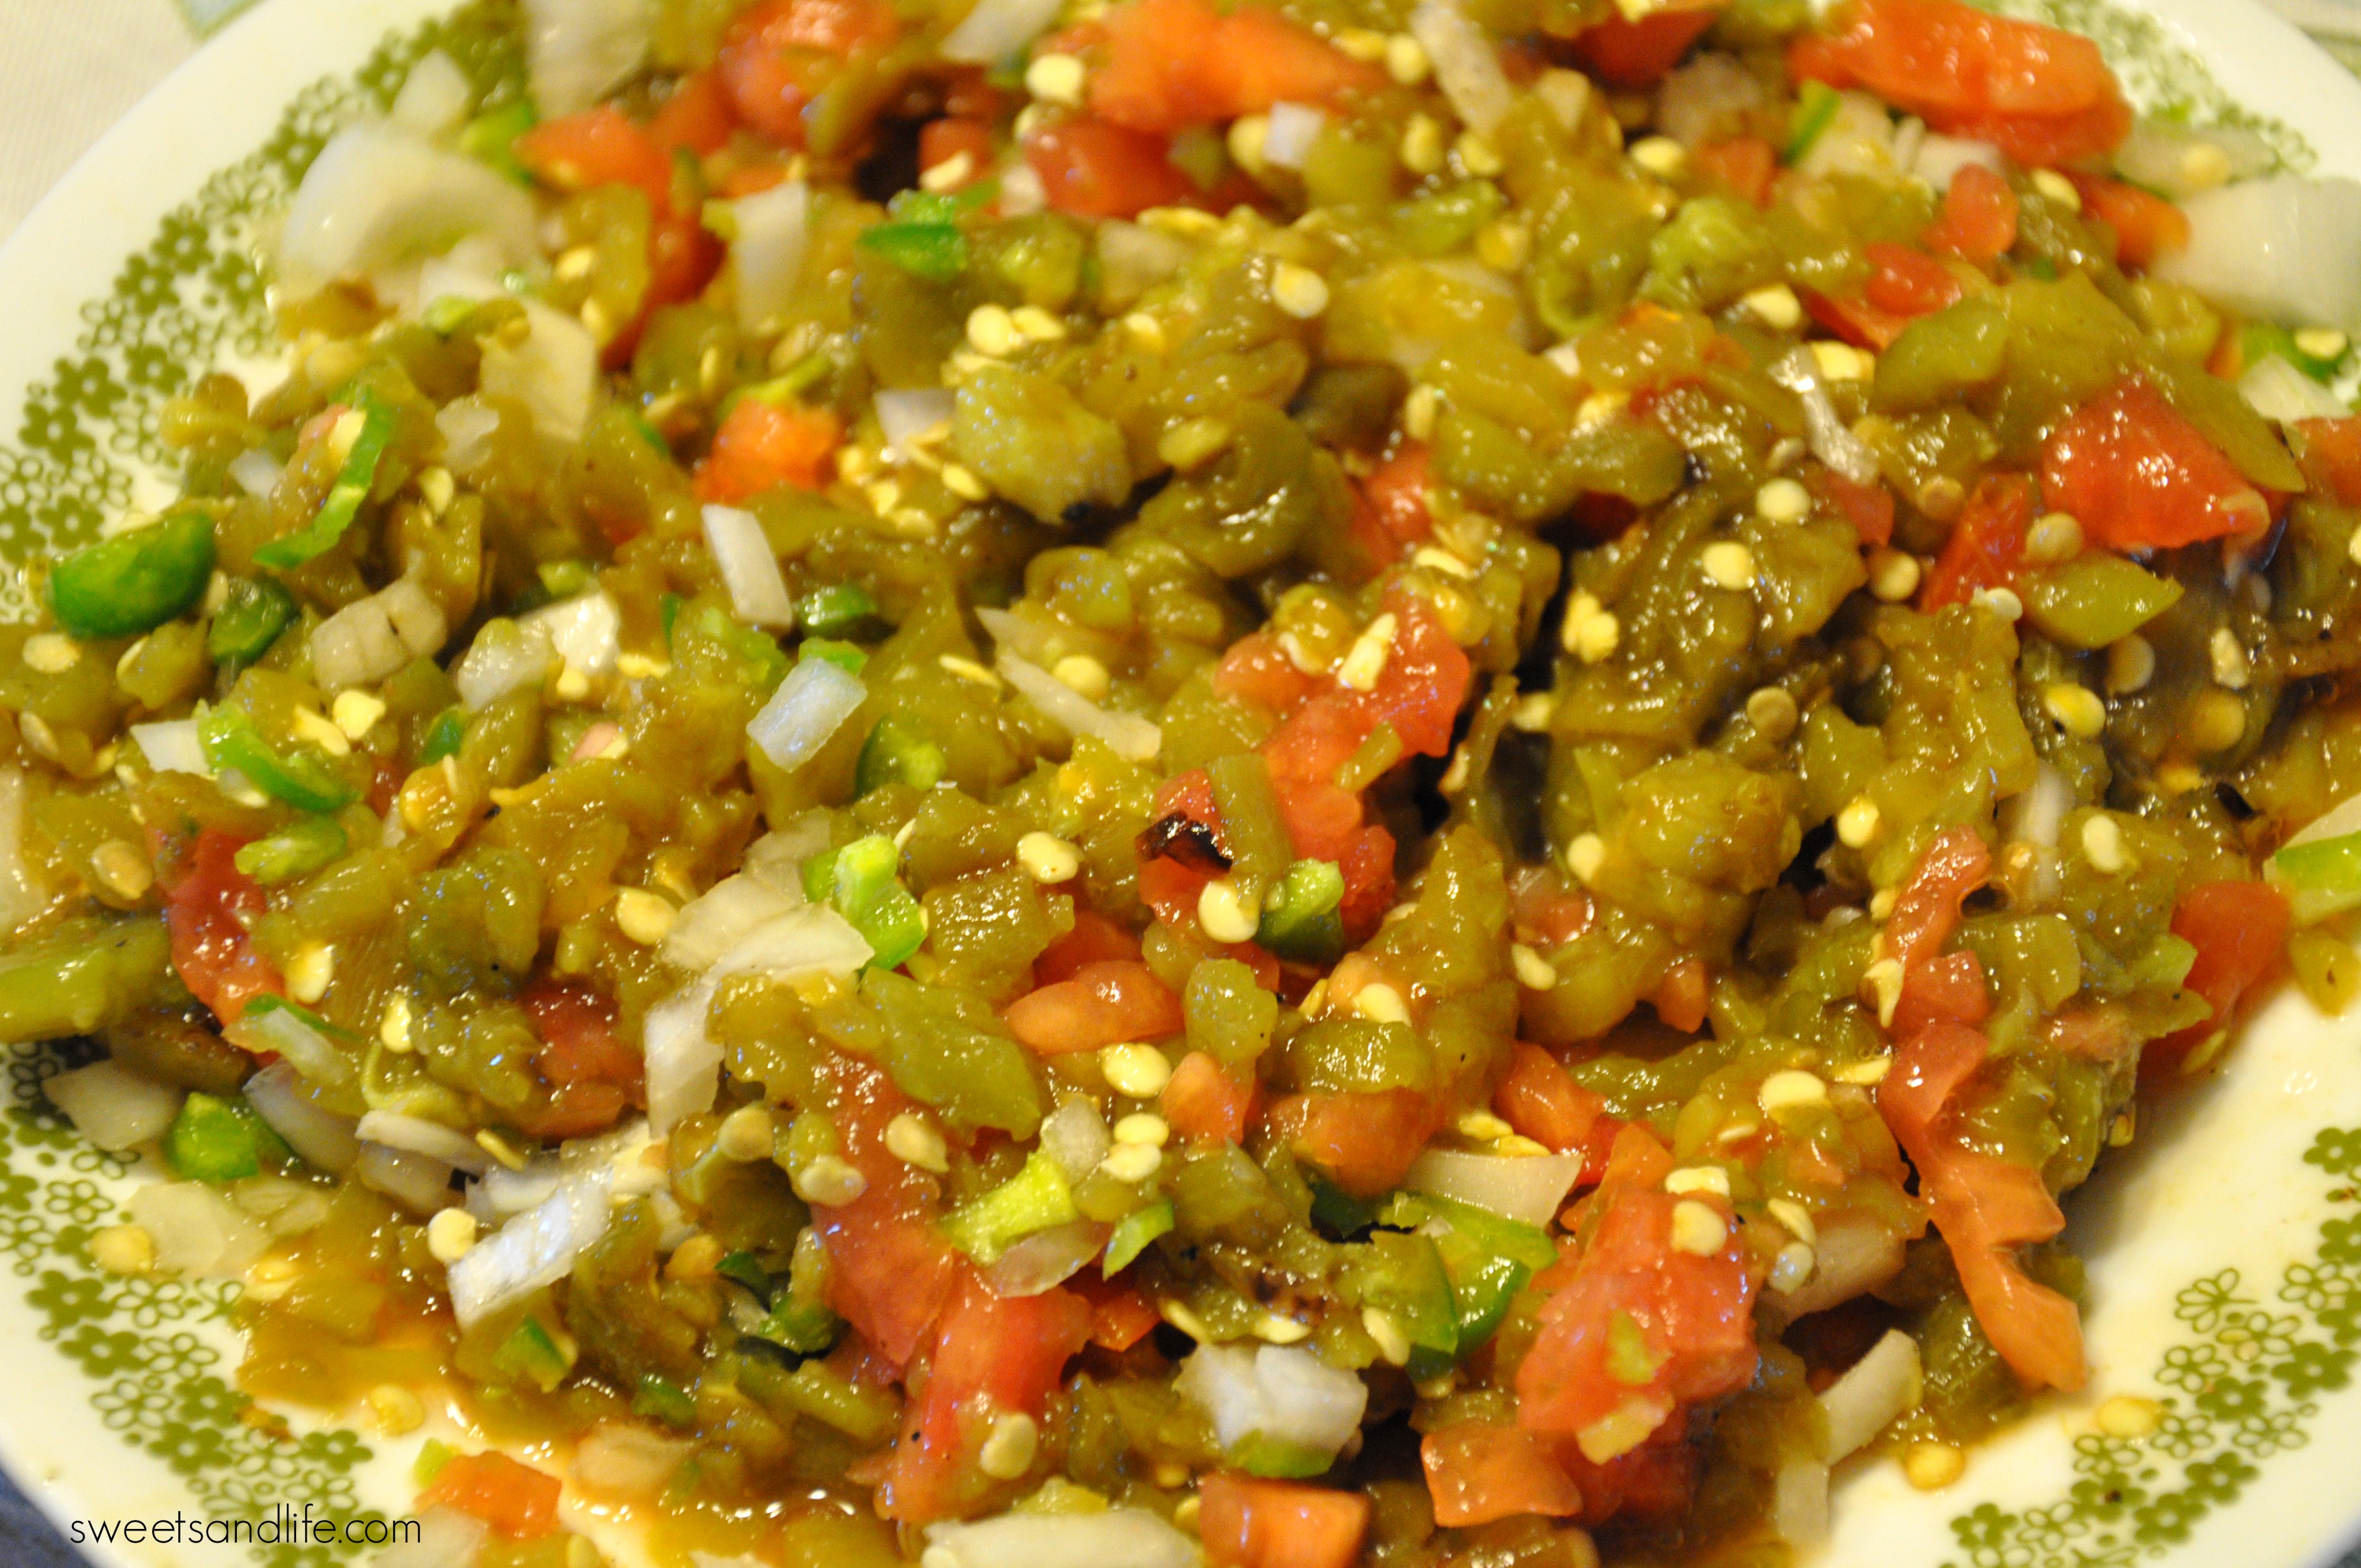
Once the chiles are completely clean go ahead and give them a rough chop.  We usually leave the seeds in but if you don’t want it too spicy go ahead and take some off.

Sweets and Life: Chile con Queso (Chihuahua Style)

Oops, I just realized I forgot to tell you to chop your tomato and onion so at this point go ahead and rough chop them now. When you are done with your crazy rough chop add them to the chile.

Sweets and Life: Chile con Queso (Chihuahua Style)

Heat the oil in a frying pan over a medium high heat.  Once the oil is hot add your mixture of chile, onion, and tomato in the pan. Stir it a few times so it doesn’t stick to the pan.  It shouldn’t take more than 5 minutes for the onions to become translucent.

Sweets and Life: Chile con Queso (Chihuahua Style)

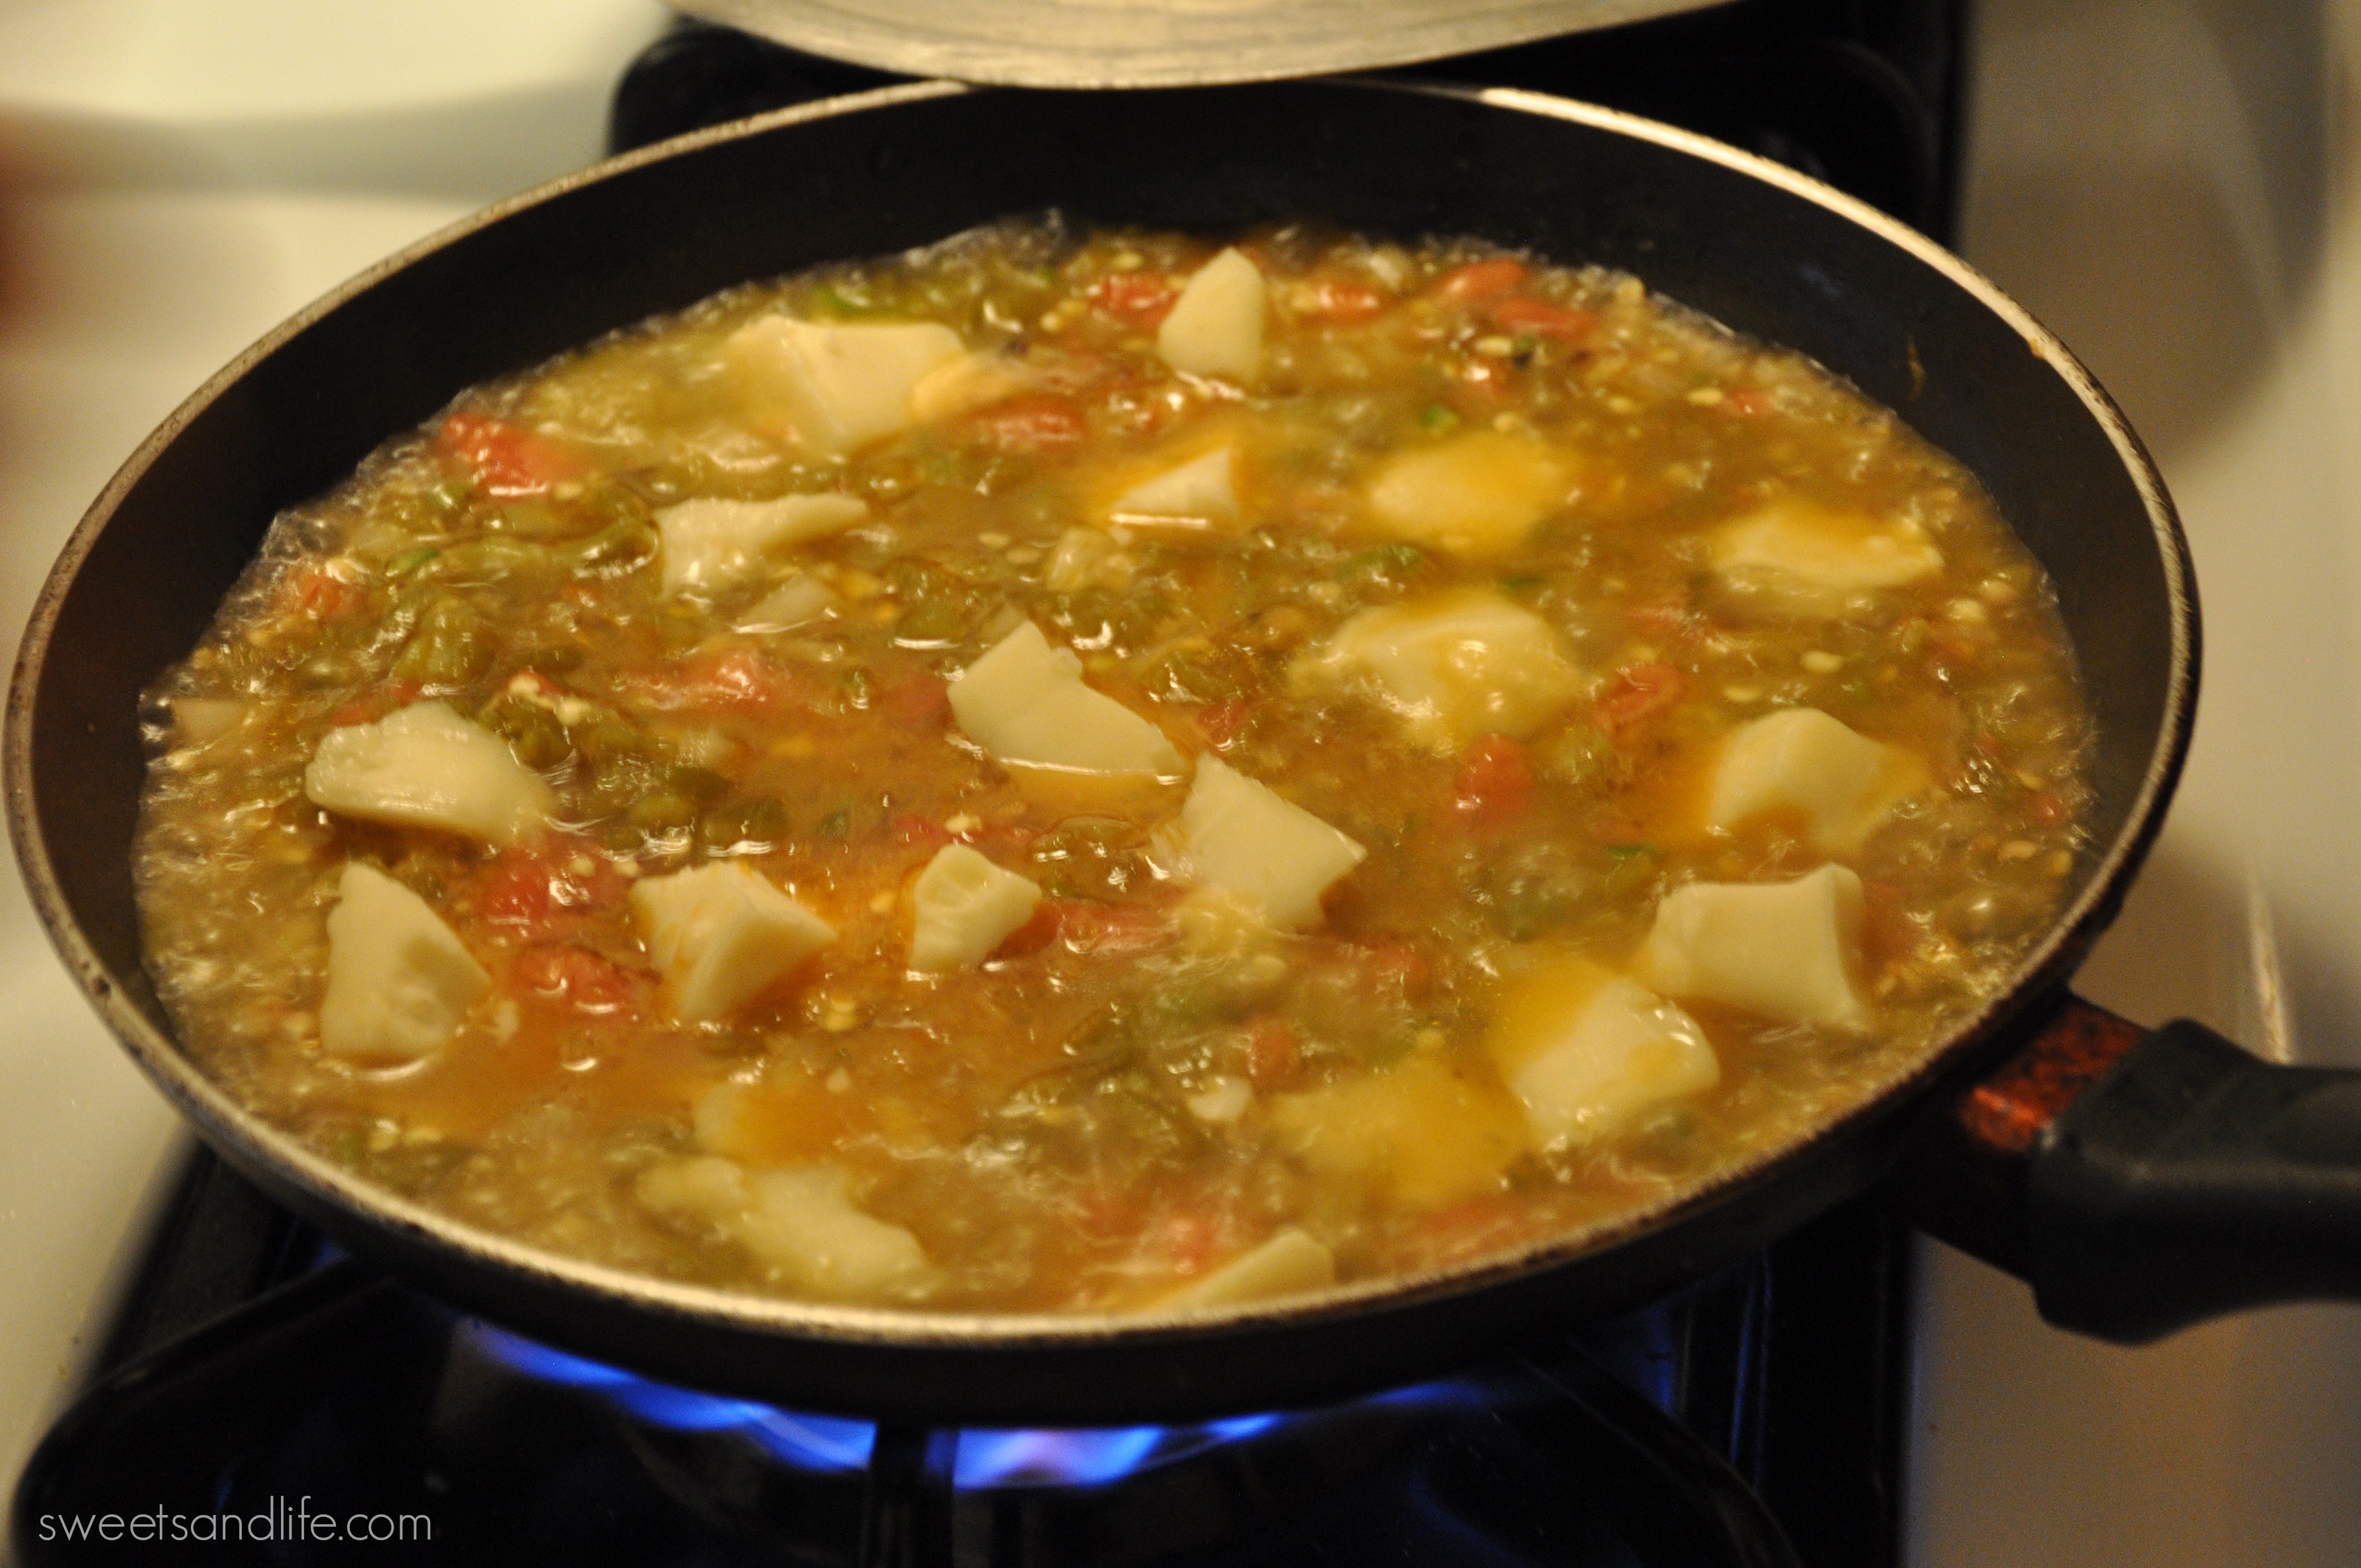
Pour the water into the frying pan very carefully and let it boil for a tad.  Add salt and pepper to taste.

Sweets and Life: Chile con Queso (Chihuahua Style)

This is my favorite part because this is where the cheese marries this delicious concoction. You can add whatever type of white  melty cheese you prefer but we usually use either mozzarella,  monterey jack, or asadero. Our favorite of the three being asadero directly from Chihuahua. Let the cheese do its magic and melt into the chile con queso goodness. Serve it with some beans, rice, and tortillas. Enjoy!

Sweets and Life: Chile con Queso (Chihuahua Style)

Ingredients

  • 8 to 10 Anaheim Chiles
  • 1 tomato
  • 1/2 white onion
  •  A dash of salt
  • A tad of pepper
  • 2 tbsp of vegetable oil
  • 1/2 cup of water
  • 1 cup of white cheese (the kind that melts)

Directions

Roast the Anaheim chiles over medium high heat. Once completely roasted take off the heat and set aside for a few minutes. Peel the skin off the chiles. Pull the stem off and rough chop the chiles. Throw away the stems and peels. Dice your tomato and onion. Mix in tomato and onion with the chile. Heat oil in a frying pan.  Put the chile mixture in the frying pan carefully and heat for about 5 minutes. One the onion is translucent pour water into the chile mixture. Boil for a few minutes. Add the cheese. Let the cheese melt. Serve alongside tortillas, beans, and rice. Enjoy!

Note

This dish can be made into a burrito or served alongside eggs for breakfast.

Recipes: Guatemalan Chilaquilas

Cheese, Cooking, Guatemalan Chilaquilas, Guatemalan food, Recipes, Tortillas

One of the hubby's favorite foods are Guatemalan Chilaquilas not to be confused with Mexican Chilaquiles.  The only problem was that my mother-in-law did not want to give me the recipe so I Googled it and found it.  This recipe is really good and very easy to make.

More loveliness here »

Recipes: Calabacitas con Queso (Zucchini with Cheese)

Cooking, Food, Mexican Mondays, Recipes
In my last post I mentioned that I was going to start a new series called Mexican Mondays.  If you've been following my blog then you should know that I'm Mexican American and I've realized that it would be fun to feature some recipes that I grew up with.  For my first post I'm featuring one of my favorite recipes and one of the easiest one to make, calabacitas con queso (zucchini with cheese).  My mom used to make this recipe for me when I was little and my grandma used to make it for me when I would go visit in Mexico.  When I had this dish at my grandmother's house she would make it with vegetables that were grown in their farm and with homemade cheese. 

More loveliness here »

Sweets: The Best Pancakes…

Baking, Banana, Cooking, Pancakes, Recipes, Sweets

...well at least thus far.  Growing up as a child my mom used to make us pancakes on the weekends, the box kind.  When I worked at the "Happiest Place on Earth" everyone used to eat pancakes at the restaurant where I worked but I used to get them from the employee diner, the pre-made stuff. Now as an adult I decided that it was time to kick the box and pre-made habit and make them from scratch.


I searched all around the web until I found a recipe that I believed deserved some attention and where I can use up some buttermilk I had.

More loveliness here »

Recipes: Glazed Brussels Sprouts

Brussels Sprouts, Cooking, Recipes

I went to do my monthly grocery shopping the other day and I found myself standing in the produce section looking at recipe cards the grocers have for customers to take.  I grabbed one that said Glazed Brussels Sprouts  and I headed on my way.  Please keep in mind that I had never purchased this vegetable or even tasted it.


Today I prepared them and to my surprise they were pretty tasty. My hubby liked them but didn't love them.  I'm trying to expand our palate and as I do that I will share with you my experiences.

More loveliness here »

Food: Why microwave at all?

Cooking, Life

When we were registering for wedding gifts everyone assumed that one of the first things we were going to register for was a microwave oven but to there surprise that wasn’t the case.  According to this 75% of people with lower income to 93% of people with higher income have microwaves in their households.  Wow! Those numbers are high.  So, why don’t we own one? Is it the cost? Our health? Environmental reasons? No not really its simply because we don’t need one.  There has been a couple of times that it seems that it would come in handy but for the most part its not a necessity for us.  When we have friends or family members come over for the first time they are usually shocked not to find one in our kitchen and are surprised when we tell them we don’t plan on buying one. My mother-in-law has even offered to buy us one and we turned it down.

The reason we don’t need one is because I usually do all the cooking at home so why would we need to reheat something in a microwave oven when we could use the pot/pan I cooked it in.  For leftovers we bring from restaurants it might come in handy but since I like to jazz things up a bit the food ends up tasting better being reheated on the stove.

The reason I bring this up today is because earlier tonight my hubby was looking for a snack in the pantry but since we don’t really have “snack” like food in there (no chips, no cookies, pretzels, etc…) he asked me if I could make some popcorn.  The normal American would simply throw a bag of popcorn into a microwave oven, set it, and take it out when the house begins to smell like butter and the kernels stop popping.  Since I just mentioned we don’t have a microwave I do it the old fashioned way my mom used to make it.  We had a microwave in my parents house when I was growing up but my mom always made it the same way.

Popcorn Recipe

  • 3 tablespoons of cooking oil
  • 1/3 cup of popcorn 
  • Salt to taste
  • Put the oil in a 3 quart or larger pan with a lid (make sure it has a lid that fits)
  • Pour in the popcorn making sure its only one layer in the bottom of pan
  • Cover pan and place it over medium high heat
  • Gently shake the pan allowing all kernels to get coated with oil
  • Keep shaking pan and slightly let some of the air get released from pan so that the kernels don’t get soggy
  • Once the oil gets hot enough you’ll begin to hear a symphony of popping coming from the pan 
  • Keep over heat and gently shaking (With all the shaking I’m sure your arm is tired)
  • Once the popping begins to slow down remove from heat
  • Don’t open the lid until it sounds safe
  • Once you’re sure they stopped popping place in bowl and add salt to taste and enjoy
If you want a similar recipe but a different technique please go check out this recipe.  I haven’t tried it for myself yet but next time I definitely will.  Her followers have also made suggestions on toppings that are worth a try.
Here is another site dedicated to popcorn or just google it.

The best part about homemade popcorn is not only the cost but that you can control how many calories it has depending on the toppings you add.  

Everyone tells me that once I have a child I will definitely get one but until now we haven’t had a need for it so I doubt we will ever have one.  I’ll keep you guys posted if we ever do.

      
My question for you today is do you have a microwave and if you do how often do you use it?  If you don’t why not?  How do you make your popcorn?