….and Now Table Numbers! Pt 2

DIY, Table Numbers, Technology, Wedding

Okay like I’ve previously mentioned we decided to go with the photo and number combo for our table numbers. I just couldn’t help myself but the tricky part was trying to figure out how to add the numbers on there. If you’ve been following my journey you must know that I’m a trial and error kind of girl. I first attempted to add the numbers using acrylic paint, then I moved on to playing with the paint program on my pc, followed by going to the store and looking for vinyl numbers, and after much frustration I went back and realized that the individuals before me that had done such a task used Adobe Photoshop. The problem was that I didn’t and still don’t own the program so to get around my little problem I downloaded the FREE 30 days trial.

So, here is what I did for those of you that don’t have time to experiment with it but remember that I’m not a professional and I’ve only had the program for 3 days.

First go to file and open the file where your photo is kept in. Once you click on it the photo should be right in front of you.

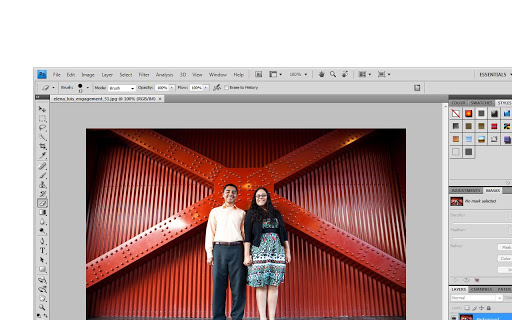
Then go to “layer” and add a new layer. Click okay. Then go to the text icon (that’s the one with the capital T on the left hand side). Click where you want to add the number at and play around with the font and size until you get what you want.


To add dimension to our numbers I clicked on the different “styles” on the right hand side. I used the one that made the numbers 3 dimensional.


Once I did that I went into “layer” section and in the “layer style” I added “drop shadow”, “bevel and emboss”, I changed the “color overlay”, and I also changed the “gradient overlay”. After all that is done this is my final product.


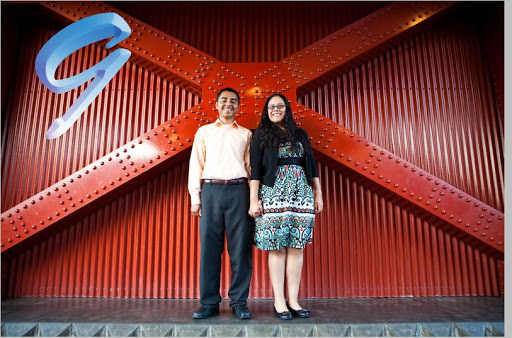
In my first attempt I made the numbers orange but thanks to my HBoO help I changed it.

Before:

After:
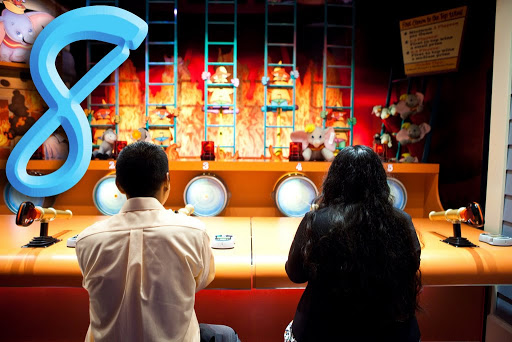
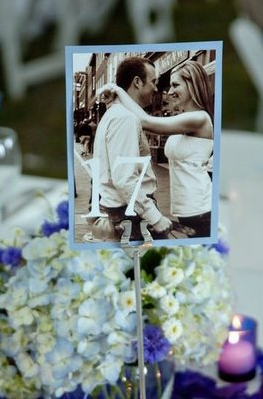
Here are our table numbers:


I added orange card stock that I had on hand and glued them to a white canvas I had cut down to fit the easels. The photos are 5×7 and I love how they look on the easels. I’m glad we went with the blue ink since it pops out and catches your attention.

Once I finished all the numbers I uploaded them to Costco Photo Center and for $5.99 I had all my table numbers. Oh and for those of you who are wondering I bought the easels at the Art Supply Warehouse for $1. 89 each.

So what do you think of my table numbers?

We have table numbers….Pt 1

reception, Table Numbers, Technology, Wedding

In my journey to become the Mrs. I have found myself developing more technical skills than I ever thought a bride could use. Like I previously mentioned here I learned how to use illustrator to make my diy map for my invitations. When I first began doing my table numbers I wanted to do something creative with the canvas that I bought from Art Supply Warehouse but after trying different things I decided that it was too time consuming to paint all the numbers by hand.

I decided to go a different route after seeing my fellow blogger August15bride‘s table numbers. How amazing are these?

Or how about Mrs. Tiramisu’s table numbers?

{Source}

I knew that I wanted to use some of our pictures to enhance our tables and make it even more personal. Next time I will tell you how I accomplished it and show you our table numbers.

Are you going to have table numbers? Where did you get your inspiration?

DIY maps Pt. 2

Map, Technology, Wedding

I left off last time by showing you some of the clip art I had chosen for our maps. Once I got an idea of what kind of design I was going for things seemed to go right along. I began by putting both our wedding location into Google maps. Once I had an idea of what the map layout would look like I began to decide what part of the map I wanted to concentrate on.


Since I didn’t really know how Illustrator really worked I printed out the map and traced it over with a pen and paper. Once I had it traced I scanned it into my computer. (I later found out that I could have done that with Illustrator by adding a layer to it and then removing it when I was done.) I guess I like to make things complicated so I learned by trial and error.I showed my FI this outline and he was confused but later loved my creativity. This is the part that Illustrator came in handy because I used it to color in stuff and move things around. I added color alright, so much that it seemed like Kermit was splattered all over the map. Once I had the color in place I added our names in the font that matched our invitations. Like I previously mentioned I went color crazy and a day later decided that it was too much.

I decided to scale it back and only add burst of color to it. I went ahead and left our names added some clip art colored it in and viola our DIY maps were done. Nothing super fabulous but simply a glimpse of the distance between the ceremony and the reception. In the back I added actual directions to the reception. The only paper I had on hand was 100% cotton paper which is what I used. The measurements that I ended up printing out was 4×6.


I’m wearing glasses on our wedding date so I went ahead and added some to the bride and since our hair color is black I also changed that.

Our colors are blue and orange so I used both of those colors as splashes of hues to make things stand out.


This is my DIY map with fwy signs and everything. Just a simple example of what can be created with Illustrator’s free trial version. I’ve used the couple in more DIY things I will share with you at another time.

What do you think? Do you get that the bells are the ceremony (in case the kissing couple didn’t give it away) and the wine glasses are the reception? Are you doing your own maps?

Illustrator + Patience = DIY Maps Pt.1

DIY, Map, Technology, Wedding

Now that the invites were sent off and I have more time on my hands and I can tell you about my adventures with Illustrator. After going to a wedding in the beginning of June I realized how useful the Map/Direction insert included in the invitation is. Val, my MOH, drove us to the wedding and although she had a navigation system in her car we relied on the map to get us there. It was clear that I wanted a map with my invitations as well. I knew I could came up with something spectacular (okay maybe not that professional but you get the point) in the likes of one of my favorite calligraphers Laura Hooper or perhaps one like Crystal Kluge. I’m not trying to show off or anything but I do posses some ability with a calligraphy pen and after taking countless art classes I to can dabble with that as well or at least that’s how the conversation went in my head. After thinking about the priorities for the wedding it seemed that my attention was required elsewhere. I decided to do a “quick” DIY map using illustrator but the problem was first trying to figure out how to use the program itself.

Here are two examples of what I was first thinking about and decided not to do:

Source

Once I decided to play with the actual layout of the design I began to look up some clip art that I would be able to incorporate into it.

Here are a couple of the ones I chose:

Finding cute designs was more difficult than putting together the whole map. I thought I was going to save time by using clip art instead of actually drawing things myself. I will continue my adventure with Illustrator on a different day.

What do you think of my clip art so far? Are you including a map in your invitations?

Reblog this post [with Zemanta]

Becoming a Tech Savy Bride…

Organization, Technology, Wedding

As soon as the wedding planning began I knew I wanted to have a wedding website but I was stunned at all the different ones available out there. Since I’m pretty frugal I decided to set up a free one. My FI wants one that is not too expensive and where we can get our names as our domain but he hasn’t had time to set it up and since I like to get things done I went ahead and set ours up. These are a some of the ones I found in my search:

The Knot

Wedding Tracker

eWedding

Our Wedding Day

Project Wedding

The one I decided to go with is Weddingwire and I love it!

Okay so let me admit if I haven’t previously done so my FI is a software engineer so he could easily set up a site write the code and make it fabulous but since work is keeping him so busy lately I had to do it myself. I love our wedding website because it keeps be very organized. Just to let you guys know he is actually very impressed with the tools that you are able to use. Since I got the thumps up from my FI it made me very happy.

Are you using a wedding website? If so which one?